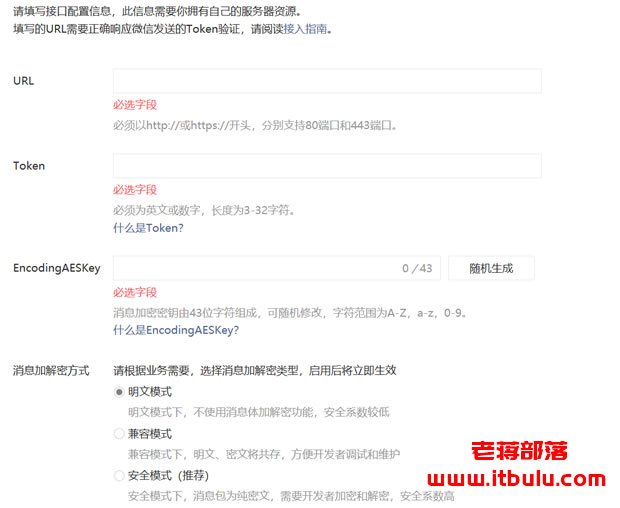
准备在基于公众号获取接口实现随机码的效果,于是需要设置Token授权。对于公众号的使用以前并不多,很早之前对于微擎的授权直接微擎记得后台是直接收授权绑定文件的。而这次需要直接在公众号后台开发者工具进行授权设置,对于Token令牌是需要设置对接并不是随机生成的。

我们可以看到在"开发"-"基本设置",有上图几项需要设置的。URL地址是需要应对授权接口的,我们需要在本地服务器中提交页面对接。
<?php
/**
* wechat php test
* 验证结束后,关闭valid验证接口,开启responseMsg消息回复接口
*/
//define your token
define("TOKEN", "vpskpcom");
$wechatObj = new wechatCallbackapiTest();
$wechatObj->valid();class wechatCallbackapiTest
{
public functiON valid()
{
$echoStr = $_GET["echostr"];//valid signature , option
if($this->checkSignature()){
echo $echoStr;
exit;
}
}public function responseMsg()
{
//get post data, May be due to the different environments
$postStr = $GLOBALS["HTTP_RAW_POST_DATA"];//extract post data
if (!empty($postStr)){
/* libxml_disable_entity_loader is to prevent XML eXternal Entity Injection,
the best way is to check the validity of xml by yourself */
libxml_disable_entity_loader(true);
$postObj = simplexml_load_string($postStr, 'SimpleXMLElement', LIBXML_NOCDATA);
$fromUsername = $postObj->FromUserName;
$toUsername = $postObj->ToUserName;
$keyword = trim($postObj->Content);
$time = time();
$textTpl = "<xml>
<ToUserName><![CDATA[%s]]></ToUserName>
<FromUserName><![CDATA[%s]]></FromUserName>
<CreateTime>%s</CreateTime>
<MsgType><![CDATA[%s]]></MsgType>
<Content><![CDATA[%s]]></Content>
<FuncFlag>0</FuncFlag>
</xml>";
if(!empty( $keyword ))
{
$msgType = "text";
$contentStr = "Welcome to wechat world!";
$resultStr = sprintf($textTpl, $fromUsername, $toUsername, $time, $msgType, $contentStr);
echo $resultStr;
}else{
echo "Input something...";
}}else {
echo "";
exit;
}
}private function checkSignature()
{
// you must define TOKEN by yourself
if (!defined("TOKEN")) {
throw new Exception('TOKEN is not defined!');
}$signature = $_GET["signature"];
$timestamp = $_GET["timestamp"];
$nonce = $_GET["nonce"];$token = TOKEN;
$tmpArr = array($token, $timestamp, $nonce);
// use SORT_STRING rule
sort($tmpArr, SORT_STRING);
$tmpStr = implode( $tmpArr );
$tmpStr = sha1( $tmpStr );if( $tmpStr == $signature ){
return true;
}else{
return false;
}
}
}
红色部分是需要我们自己自定义的Token,同时与公众号设置界面的Token保持一致。EncodingAESKey随机生成即可。然后进行连接配对。
PS:如果提示还不行,我们需要在" 公众号开发信息"中授权IP白名单,因为我有设置,不清楚这个白名单对于这个是否起到效果。

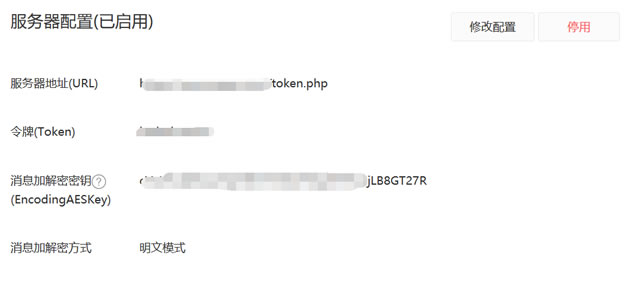
然后我们启动即可,看到上图所示,这样就表示连接畅通。
未经允许不得转载:Just My Socks中文教程网 » 微信公众号平台如何设置服务器地址(URL)和令牌(Token)配对启用的教程
 Just My Socks中文教程网


